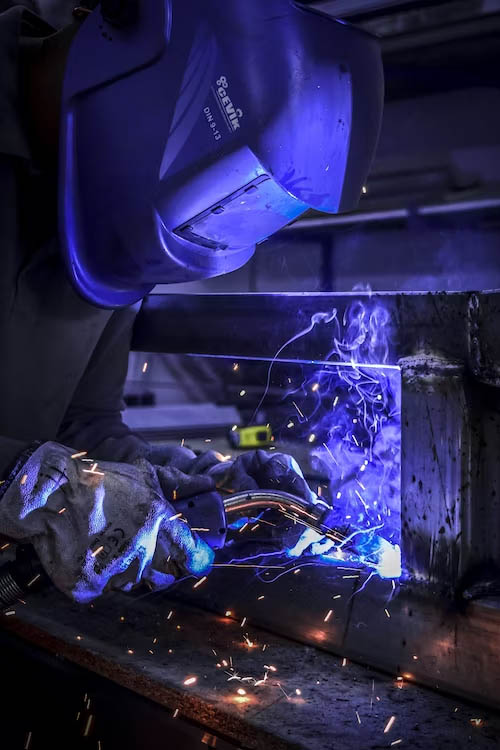
Mild steel and stainless steel are two of the most common materials used in MIG welding. While they do share similarities, these two metals are not the same.
Stainless steel is a firm favorite because of its durability, corrosion resistance, and appealing aesthetic — but it’s also much harder to MIG weld compared to mild steel.
MIG Welding Wires Explained
Welding Town
MIG welding stainless steel requires more attention to detail because of its higher thermal conductivity and low thermal expansion.
If that sounds like Greek to you, don’t worry…
In this article, I break down MIG welding stainless steel, why it’s more challenging than MIG welding mild steel, and the preparation required for a successful weld with stainless steel.
Why is Welding Stainless Harder than Mild Steel?
Stainless steel contains chromium, which gives the metal its corrosion-resistant properties and makes it harder and more durable than mild steel.
As a result, welding stainless steel is more challenging than welding mild steel because stainless steel has a higher melting point, requiring more heat input and higher welding amperage.
Stainless steel is also more prone to thermal expansion and contraction due to its higher thermal conductivity, which can lead to distortion and cracking.
Additionally, stainless steel has a lower thermal diffusivity than mild steel, which slows heat penetration into the welded joint and heat-affected zone (HAZ), making it harder to weld.
This makes heat control an important factor in welding stainless steel. If there is too little heat, the metals will not combine, but if the metal stays hot for too long it will change the chemical makeup of the metal.
With mild steel, the biggest concern with using too much heat is burning through the material. However, when stainless steel gets too hot for an extended period, it can cause the depletion of chromium carbide. As a result, the stainless steel will lose its corrosion resistance – jeopardizing the strength of the weld and how it looks.
Since people choose to use stainless steel because of its corrosion resistance and its aesthetic, it’s vital that the chromium in the metal is preserved.
Lastly, not all stainless steel is the same. Since this metal is an alloy, there are several different chemical compositions, and each welds differently.
Choosing A Shielding Gas
The best shielding gas when welding MIG welding stainless steel is called a ‘tri-mix gas’. This gas mixture typically consists of 90% helium, 7.5% argon, and 2.5% CO2.
The helium in the mixture helps prevent oxidation of the weld, protecting the weld from weakening and losing its corrosion resistance. The argon and CO2 in the gas provide reliable shielding around the weld, preventing contamination and ensuring a smooth, consistent bead appearance.
The CO2 levels are purposefully kept low in the mixture to prevent damage to the corrosion-resistant properties of the metal.
Selecting A Stainless Steel MIG Wire
When MIG welding stainless steel, it’s important to use a wire that is specifically designed for welding this type of metal. For example, if you are welding a 316 stainless steel, the correct wire would be ER316.
However, the most commonly used wire for MIG welding stainless steel is ER308L. This is because the 304 alloy of stainless steel is the most widely used, and using a higher stainless alloy than the material being welded is common, as it can be used to weld all grades lower than it.
For instance, ER308 MIG wire can be used to weld 301, 302, 304, and 305 grades of stainless steel.
If you are welding a less common type of stainless steel like ferritic (400-series) or martensitic (420-series), then you would use the correct series wire to match.
The welding of these uncommon types of stainless steel requires a different approach and setup, which is beyond the scope of this article.
Preparing to Weld Stainless Steel
Welding stainless steel is similar to welding mild steel, and it uses the same basic process. Cleaning your material and work area is one of the most important factors in getting a good weld.
You need to also set your machine for welding stainless and choose the correct wire and gas. The most challenging part will be mastering the technique since it is slightly different.
Preparing The Surface
Before welding stainless steel, you must clean the metal thoroughly to remove any dirt, oil, or other contaminants that could affect the quality of the weld.
Contaminants on the surface of the stainless steel can prevent you from making a proper connection and can also create defects in the weld that weaken its strength and affect its appearance.
You can easily clean the surface by using a grinder or wire brush with stainless steel bristles () and a degreaser or solvent to remove oils and other contaminants.
Avoid using brushes with carbon steel bristles, as they can also contaminate the stainless steel surface.
Once the metal is clean, it is important to avoid touching it with your bare hands, as the oils from your skin can contaminate the surface. Instead, use a clean cloth or gloves to handle the metal instead.
Use A Proper Joint Fit-up
Clamping down and aligning your materials before welding is important for keeping the metals in place and controlling distortion – especially when welding thinner materials.
To achieve a precise fit-up, make sure the edges of the two pieces of metal are correctly aligned and the gap between them is consistent.
The gap should be small enough to prevent excess heat buildup, which can cause the metal to warp or distort.
To reduce distortion when welding steel, you should use backing strips. These strips are placed behind the weld to provide support and distribute the heat evenly, preventing the warping of the metal.
Copper is an ideal choice for backing strips as it conducts well, but make sure it’s nickel plated to avoid copper inclusion in the weld.
Consider Edge Beveling
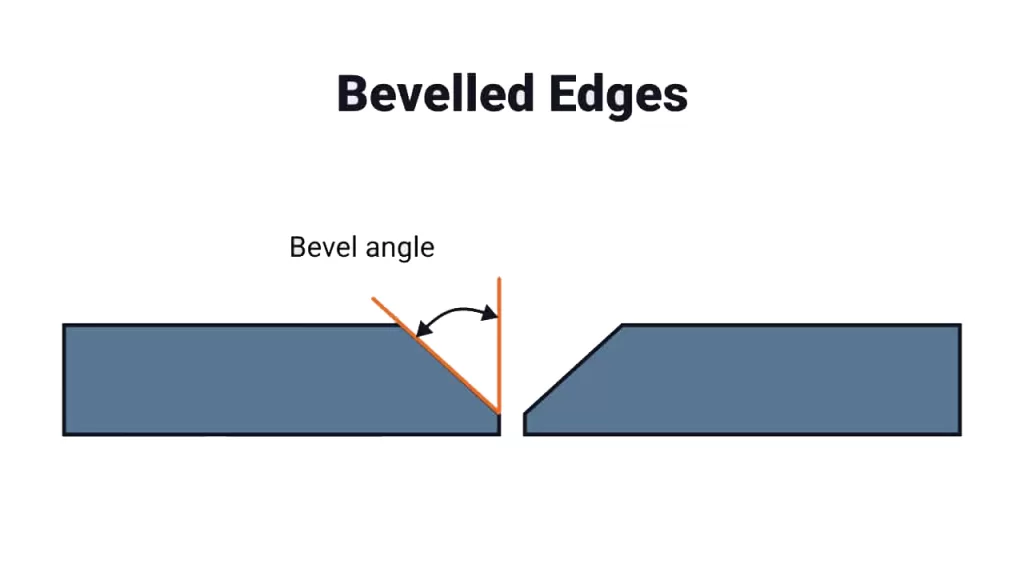
Beveling edges aren’t always necessary, but it is a good idea to get as much penetration as possible as stainless steel has low thermal diffusivity.
This is more beneficial for thicker materials because it allows the filler material to get down further between them. In contrast, thin materials do not need beveling since the weld will easily penetrate through the metal.
Preparing Your MIG Welder
Here’s how to prepare your MIG welder for a successful weld:
Check The Polarity
MIG welding requires DC electrode positive, also known as reverse polarity, to work correctly. Your welder should already be in this position if you’ve done previous MIG welding.
However, if you’ve used your machine for flux-cored welding, you will need to reverse the polarity. Changing polarity is pretty easy and is done by switching the connections on to lugs inside the cover.
Using The Correct Amperage
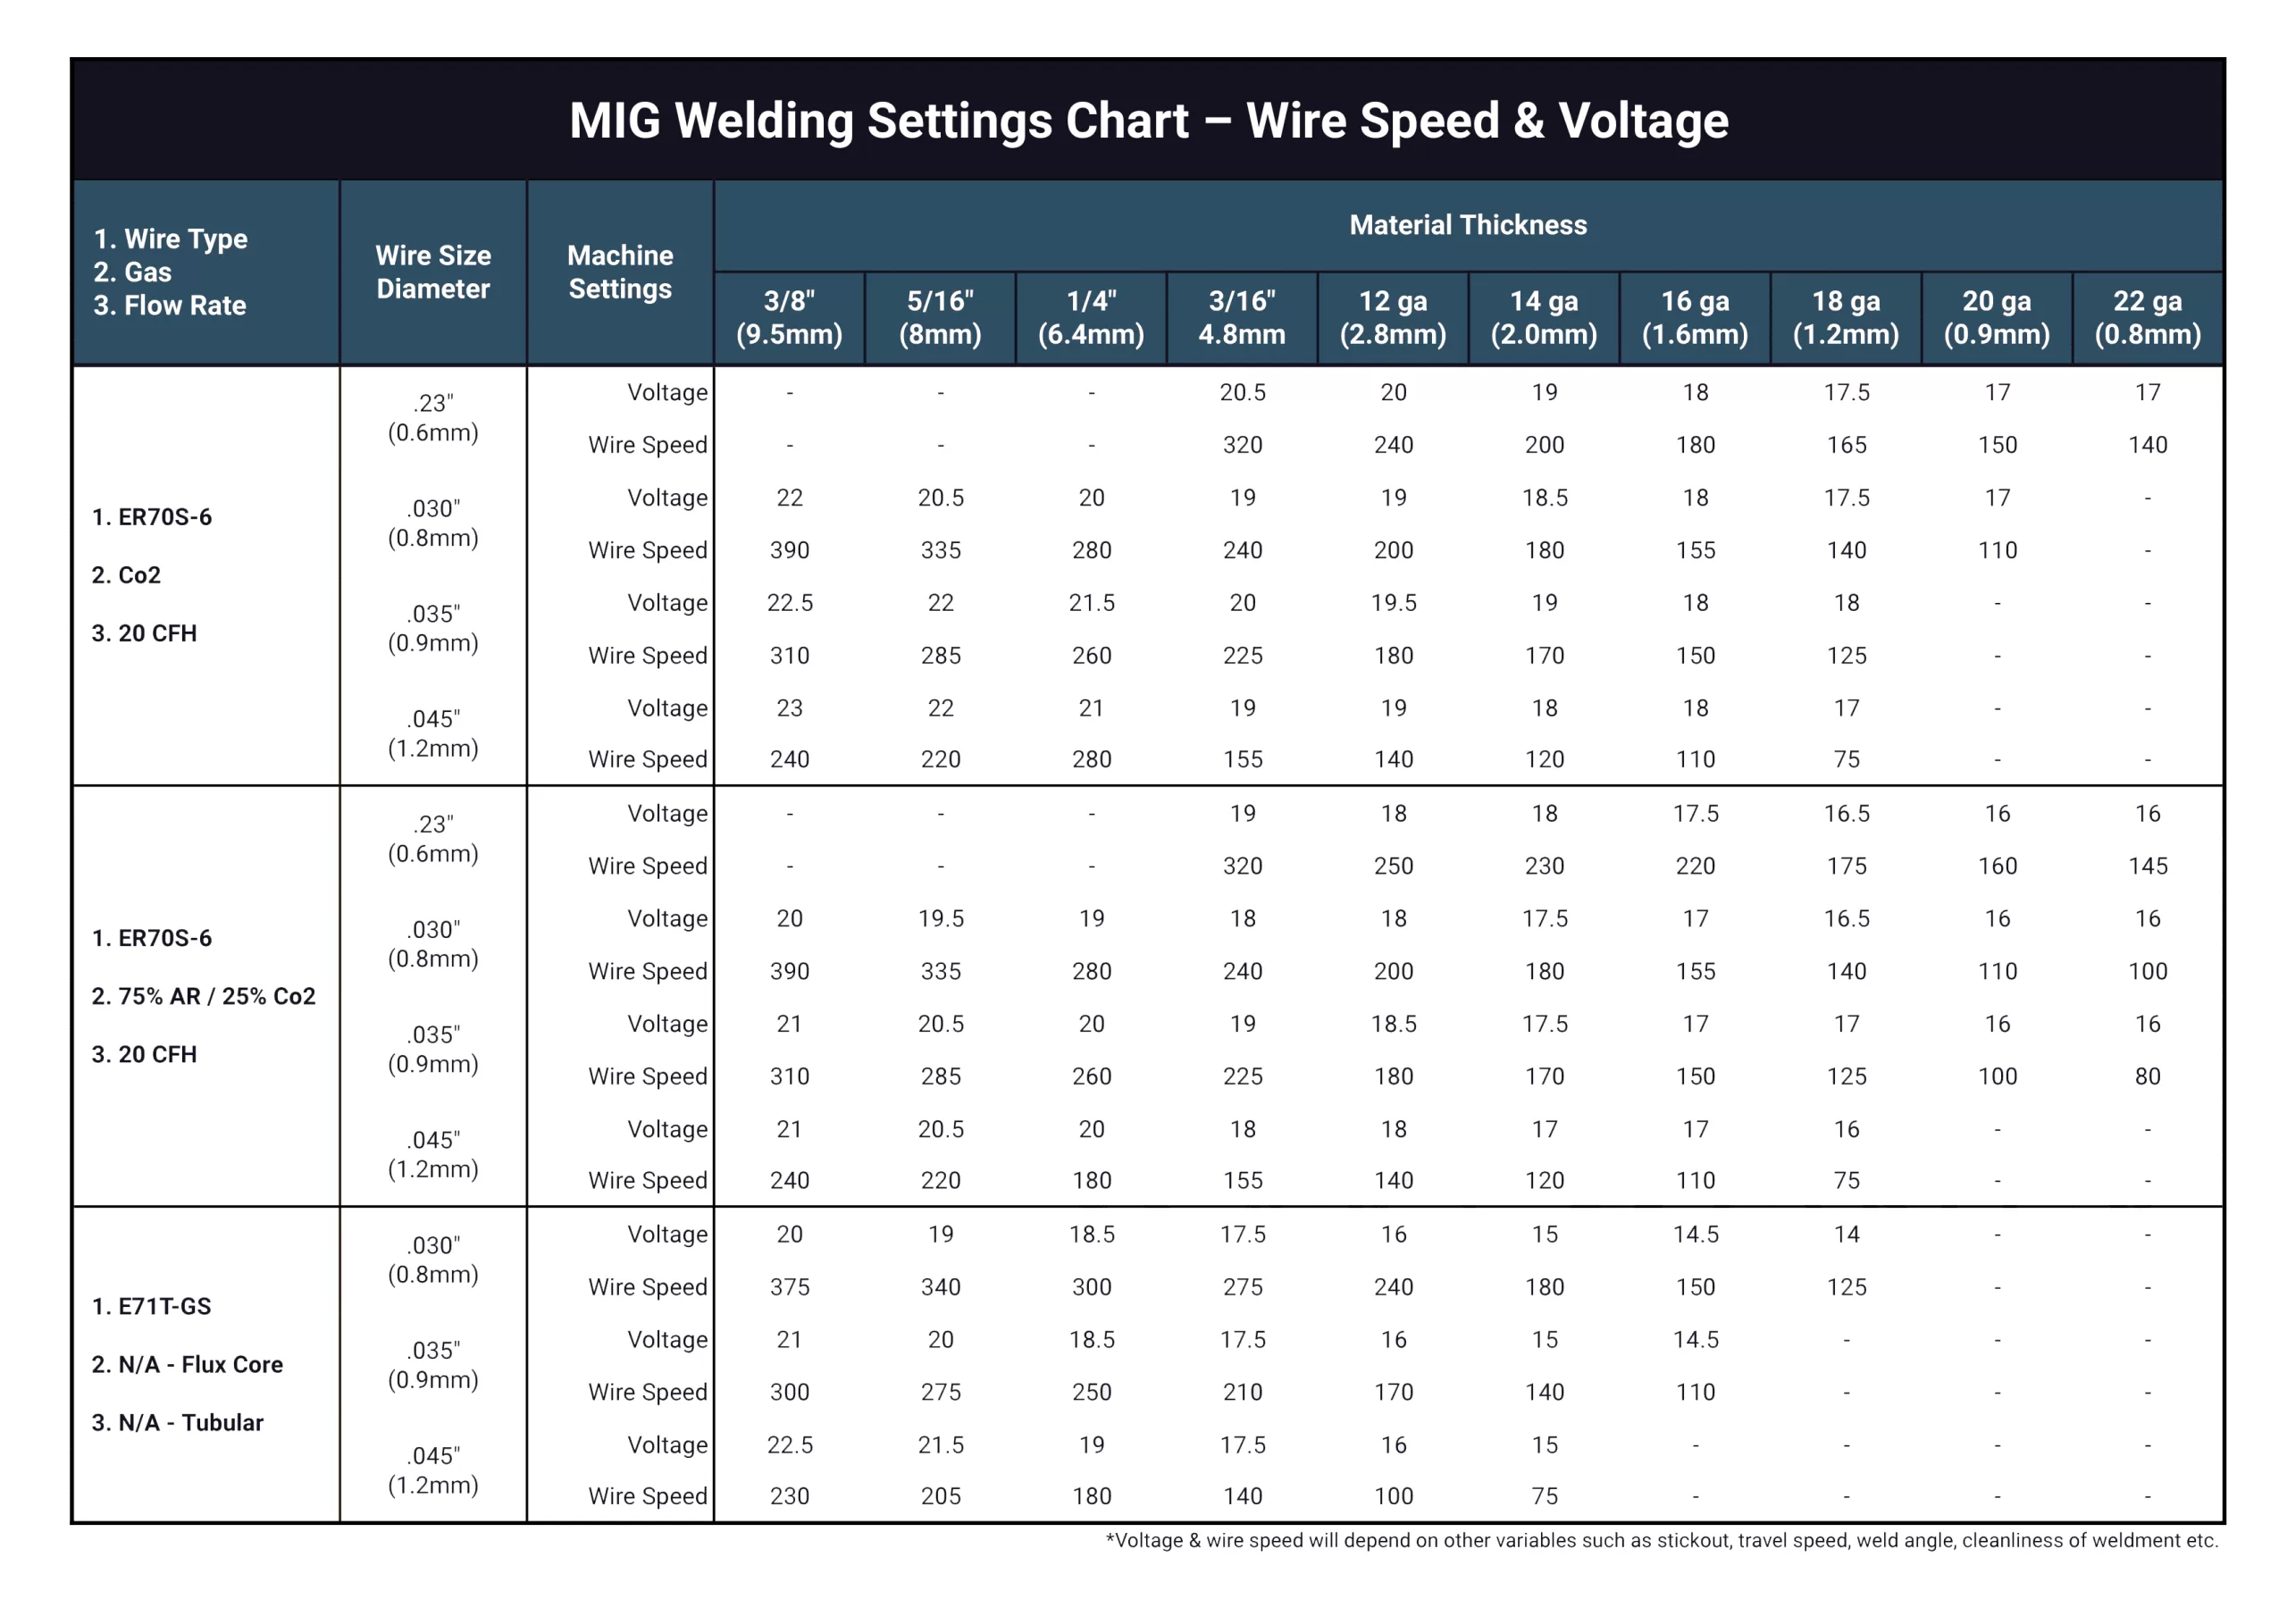
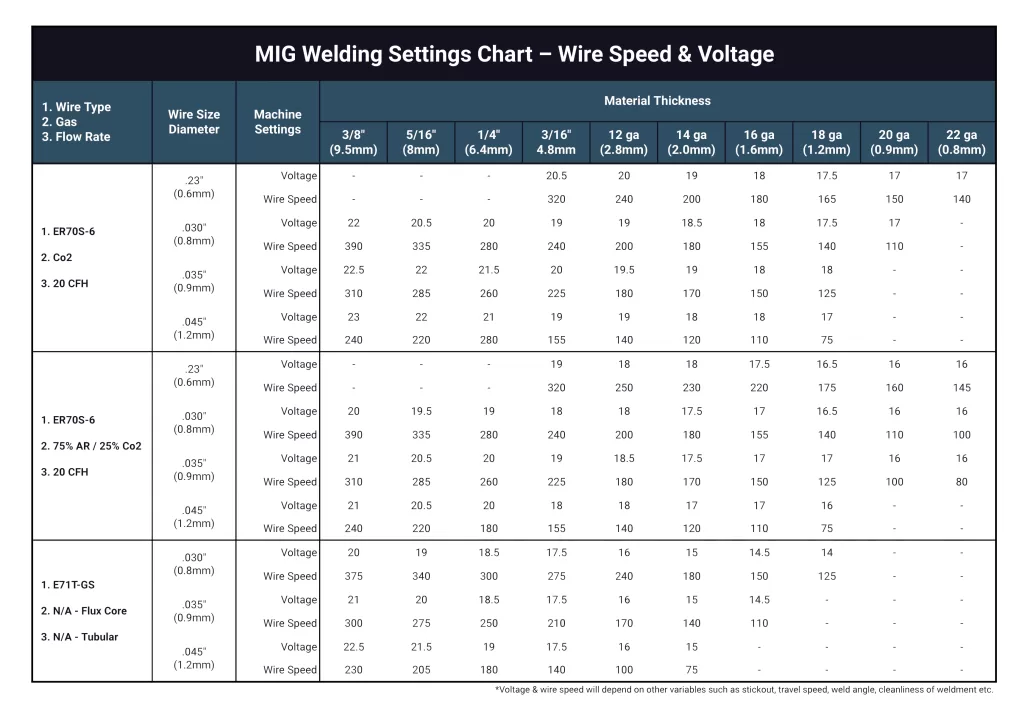
The amperage output required for MIG welding stainless steel depends on the thickness of the metal being welded, the wire diameter, and the type of MIG welding being performed. Generally, a higher amperage output is needed for welding thicker sections of metal or for using a larger wire diameter.
As a rough guide, for most steels, the amperage output should be set to around 1 amp for every 0.001” of thickness.
For example, if you are welding 12 gauge with a thickness of 0.105”, you should set the machine at 105 amps. With stainless steel, you can reduce this slightly as it retains heat better than mild steel.
Just bear in mind that these settings are a general guideline to start with, and you should always test on a scrap piece of metal to fine-tune the settings to meet your specific needs.
Please see the chart below for the general guidelines to work from using voltage:
Use Separate Drive Rolls and Liner
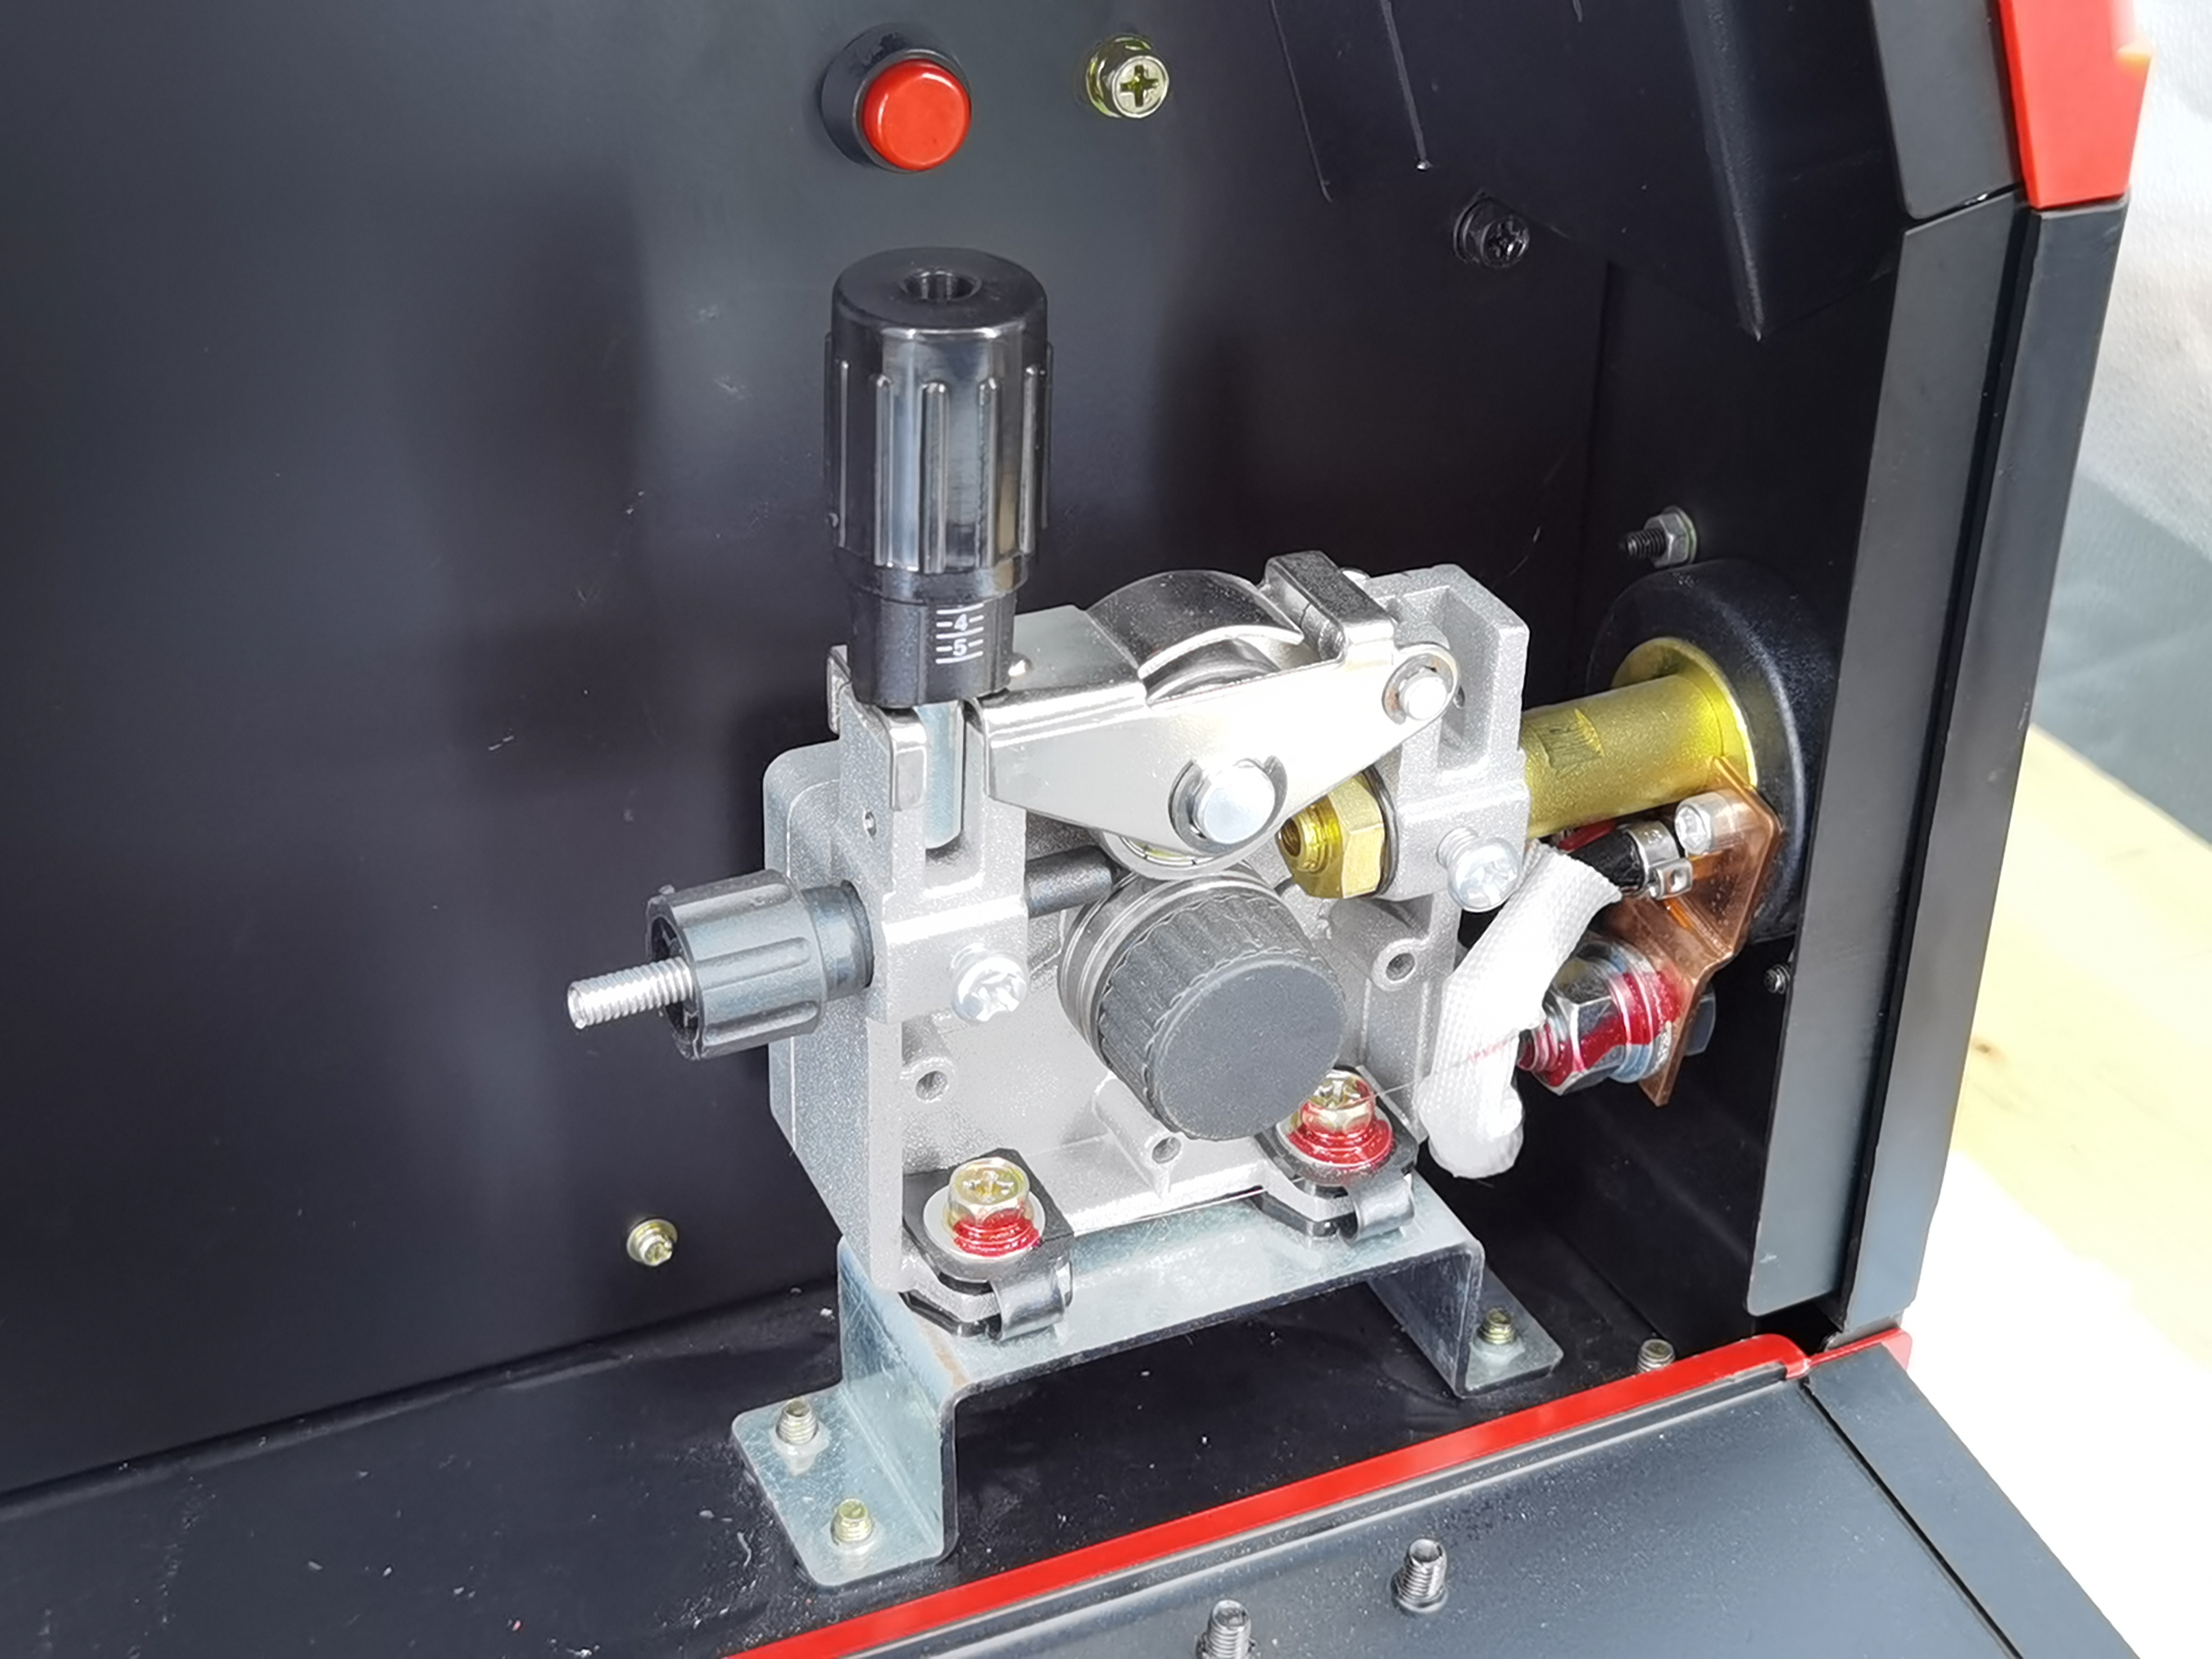
If you are welding other metals, you need to ensure that cross-contamination does not occur in your stainless steel welds by using drive rolls and a MIG gun liner that is dedicated specifically to welding stainless steel.
You can change the drive rolls and liner in the gun or use a separate welding gun designated for stainless steel welding.
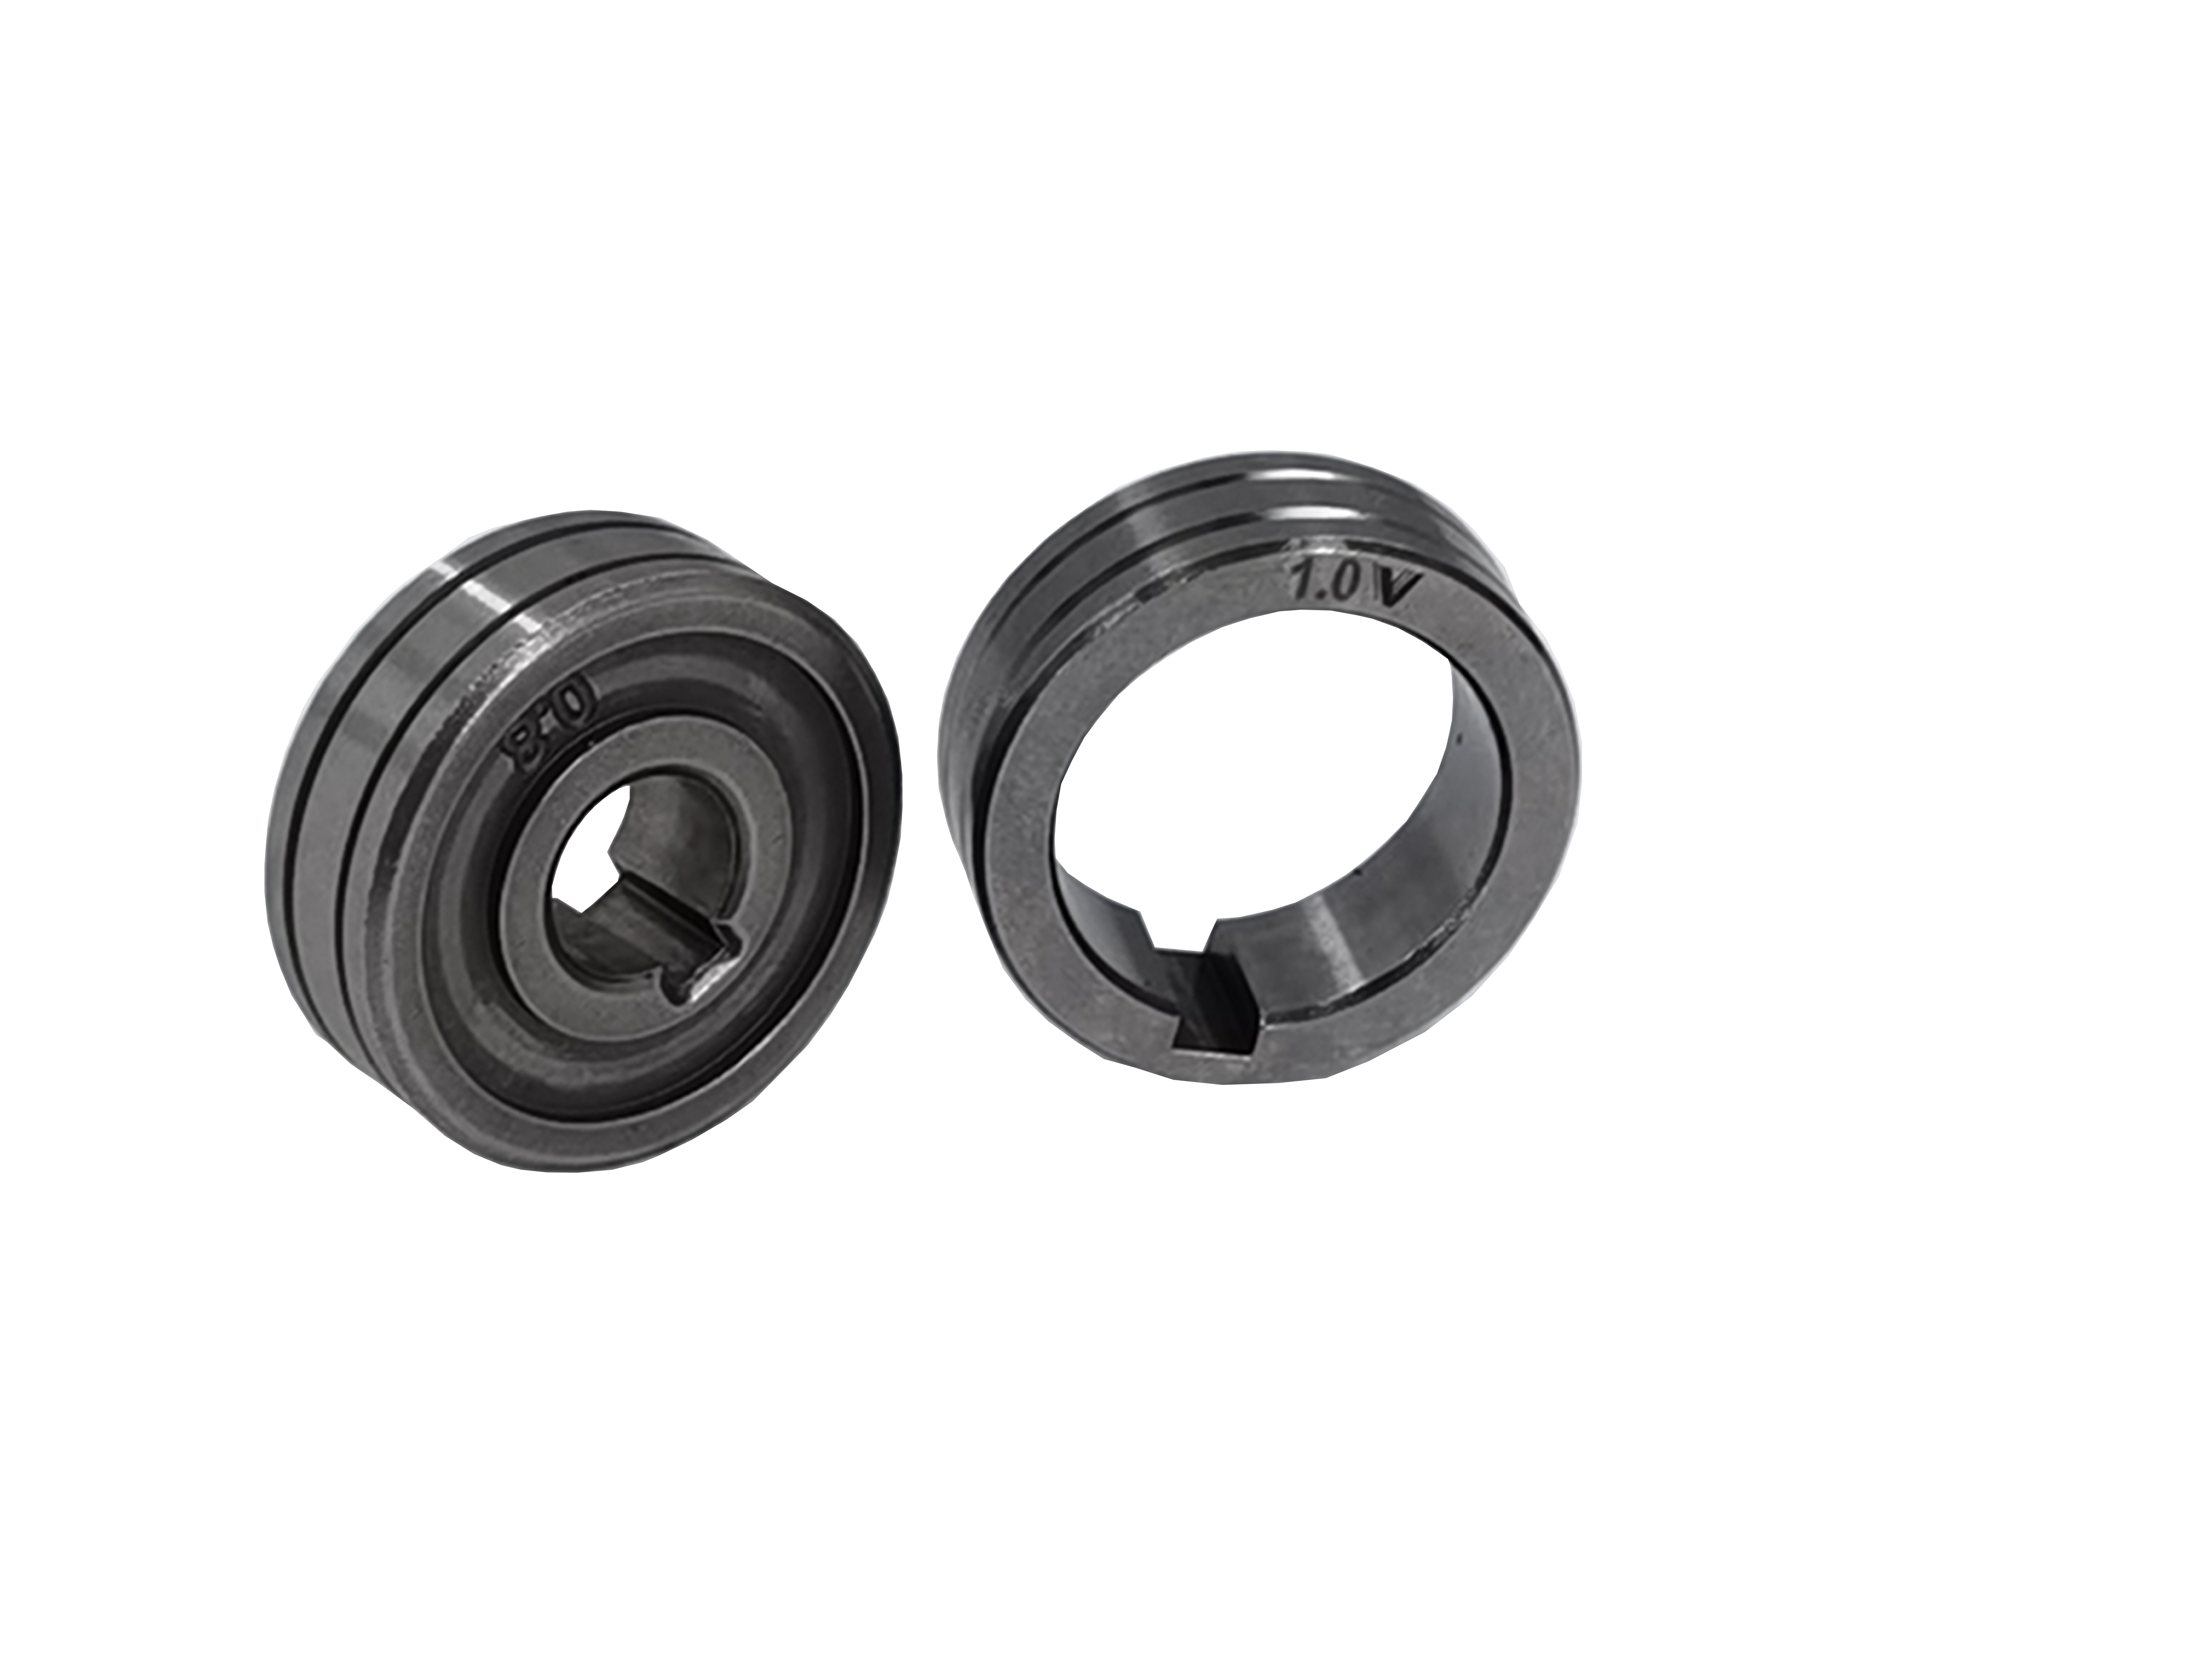
Additionally, stainless steel filler metals are harder than other types of filler metal, making it difficult for V-groove drive rolls to get a good grip on the wire.
To improve the grip, use V-knurled drive rolls with stainless steel.
5 Tips To MIG Weld Stainless Steel Successfully
- Use the push technique: When welding, using a push technique instead of a drag technique will result in a better-looking weld bead and better puddle wetting.
- Watch your travel speed: Maintain an appropriate travel speed while welding in order to minimize the amount of heat entering the base metal. Make sure not to travel too slowly, as this can lead to excessive heat generation.
- Be mindful of the weaving technique: The weaving motion when MIG welding stainless steel can cause an increase in heat input to the base metal, leading to carbide precipitation. To avoid this, use a stringer bead, especially when welding pipes.
- Adjust the inductance: A “ropey bead” is a typical characteristic of stainless steel welds when compared to mild steel. This is because the surface tension of the weld puddle causes the bead to form quickly, preventing it from flowing to the edges of the weld. To allow the puddle to flow more, increasing the inductance on MIG welders can be helpful.
- Use post-flow gas coverage: Using post-flow when MIG welding stainless steel can help to improve the quality and consistency of the weld. Post-flow refers to the flow of shielding gas that is continued after the welding arc has been terminated. This can help to protect the weld pool and the weld bead from the surrounding atmosphere, which can prevent contamination and oxidation of the weld. To do this, keep the gun nozzle close to the end of the weld for up to three seconds as the weld puddles and solidifies.
Wrapping It Up
Now that you know everything about welding stainless steel, it is time to pick up a welder and get going. Just remember, your first weld won’t be very good, so start by practicing on some scraps. Be prepared for a little disappointment, and have some patience as you learn how to perfect the weld.
Don’t worry if your welds aren’t very pretty, and instead, focus on getting good penetration and keeping an even travel speed. Eventually, your welds will start to improve.
FAQs
Can you MIG weld stainless steel with flux-cored wire?
Yes, you can weld stainless steel with flux-cored wire. Just be sure to purchase flux-cored wire that is designed for welding stainless steel. Also, change the welder’s polarity if you previously welded with shielding gas.
Can you MIG weld stainless steel?
Yes, you can MIG weld stainless steel by following the instructions above. The main thing you need to do is get the right shielding gas and MIG wire. The wire and gas used for welding mild steel are very different from that used to weld stainless steel.
Can you weld stainless steel with normal MIG wire?
No, you need to use a special wire like ER308. While it is possible to use normal MIG wire, you will not get a strong bond because the filler material does not match the metal you are welding.
Can I use 75/25 to MIG weld stainless steel?
It is possible to use 75/25 gas, but the metal may oxidize. Gas used for welding stainless steel is designed to remove carbon and impurities that would otherwise cause the weld to oxidize and potentially fail.
Can I MIG weld stainless steel with 100 argon?
No, 100% Argon is not a good gas for stainless steel.


